The Nertia Chatbot Maker brings everything you need to create, manage and improve your AI chatbots into one platform.
From the dashboard, you can build branded chatbot widgets, upload business documents, test responses, review customer conversations and monitor usage. The platform is organised into clear sections, making it easy to move between creating your chatbot and managing it after launch.
This guide provides an overview of each area of the platform and explains how it can support your chatbot setup.
Home: Your Account Dashboard
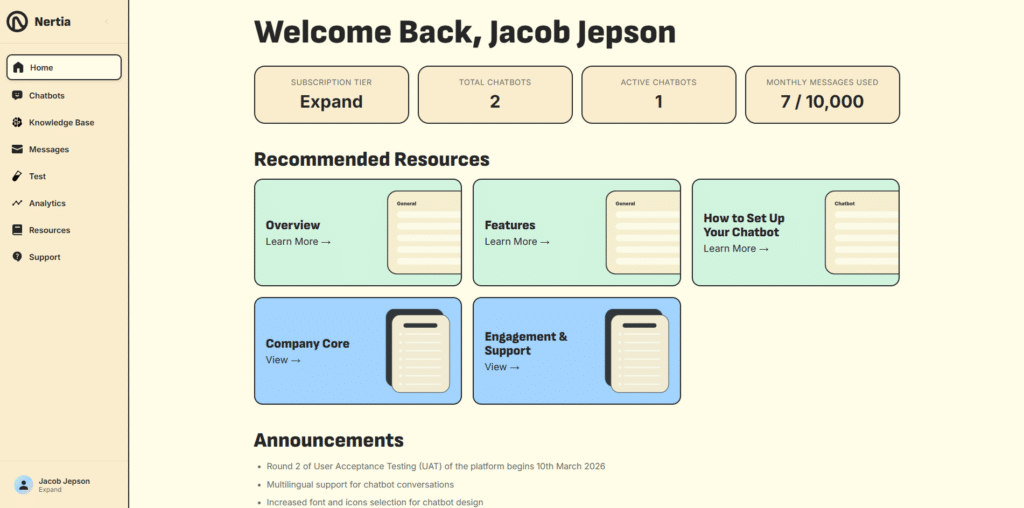
The Home page gives you a quick overview of your Nertia account.
At the top of the dashboard, you can view important account information, including:
- Your current subscription tier
- The total number of chatbots you have created
- The number of active chatbots
- Your monthly message usage and allowance
This allows you to check your account activity without opening each section individually.
Recommended Resources
The dashboard also displays recommended platform guides and Knowledge Base templates.
These resources can help you learn how the platform works, set up your first chatbot and create documents containing useful information for your AI assistant.
Recommended content may include:
- Platform overview guides
- Platform feature explanations
- Chatbot setup instructions
- Company information templates
- Customer engagement and support templates
Announcements
The Announcements section contains important platform updates, upcoming features and service notices.
Checking this area regularly can help you stay informed about changes to the Nertia Chatbot Maker.
Chatbots: Create and Manage Your AI Assistants
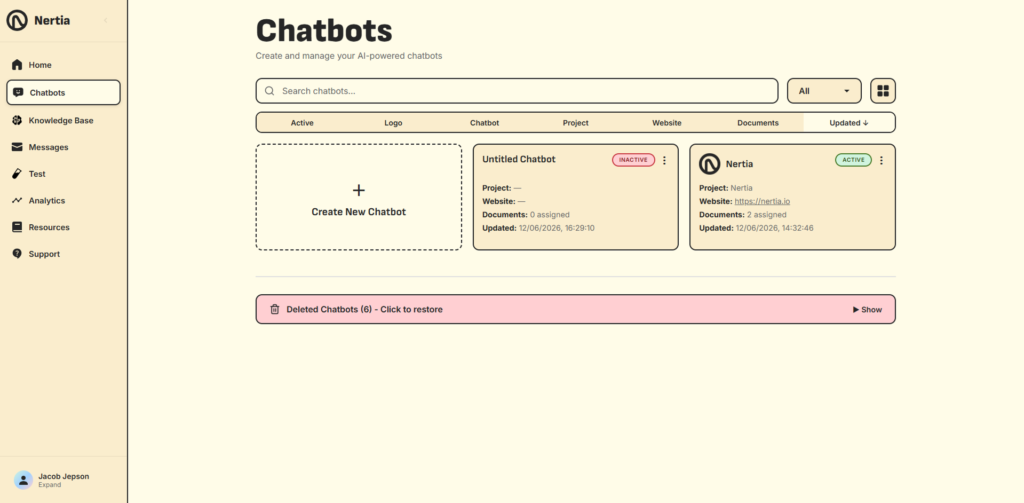
The Chatbots page is the main workspace for managing the chatbots connected to your account.
Each chatbot card displays useful information such as:
- Chatbot name and logo
- Active or inactive status
- Assigned project
- Connected website
- Number of assigned documents
- Date and time of the latest update
You can search your chatbots, filter the list and switch between the available display views.
Create a New Chatbot
Select Create New Chatbot to open the chatbot builder.
The setup process is divided into three main areas:
- Design
- Knowledge
- Publish
Inside the builder, you can customise the widget, add business information, assign knowledge sources and retrieve the code needed to install it on your website.
Edit an Existing Chatbot
Select an existing chatbot to return to its settings.
You can update its appearance, homepage buttons, project information, language, assigned documents and publishing settings whenever required.
Active and Inactive Chatbots
Each chatbot is marked as either active or inactive.
An active chatbot is available for use once correctly installed on your website. An inactive chatbot can still be edited and prepared but will not be available to website visitors.
Deleted Chatbots
Deleted chatbots are stored in a separate section at the bottom of the page.
Open Deleted Chatbots to view and restore a chatbot that was previously removed.
Knowledge Base: Manage Your Business Information
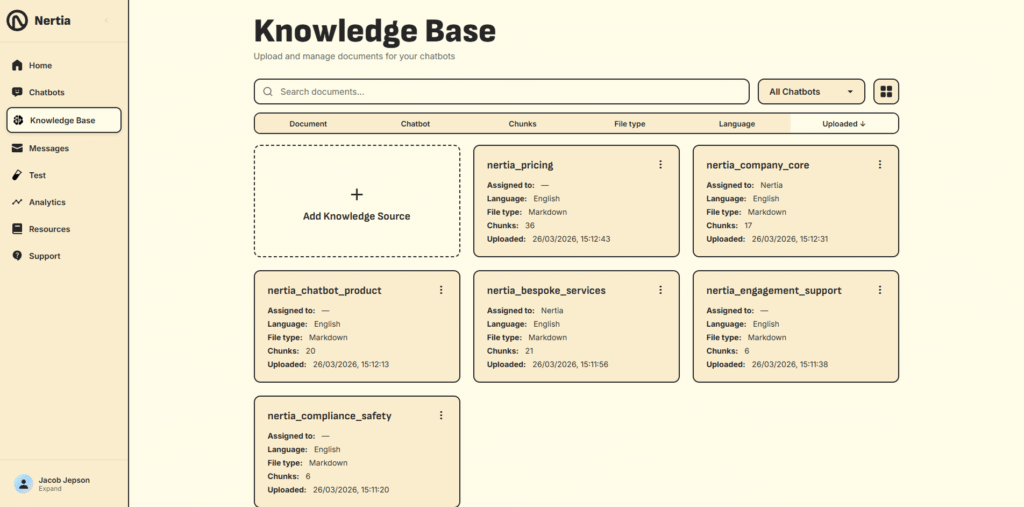
The Knowledge Base is where you upload and manage the documents your chatbots use when answering questions.
Rather than relying only on general AI knowledge, your chatbot can retrieve relevant information from the documents you provide.
Knowledge sources may contain:
- Company information
- Products and services
- Pricing details
- Frequently asked questions
- Customer support guidance
- Policies and procedures
- Technical documentation
- Onboarding information
Understanding Document Cards
Each document card includes information such as:
- Document name
- Assigned chatbot
- Native language
- File type
- Number of content chunks
- Upload date and time
The chunk count shows how the uploaded document has been divided into smaller sections that the chatbot can search when preparing an answer.
Upload a Knowledge Source
Select Add Knowledge Source to upload a new document.
Give the document a clear name, choose the language it was originally written in and select the file from your device.
Using descriptive document names makes your Knowledge Base easier to manage as you add more information.
Assign Documents to Chatbots
Uploading a document does not automatically connect it to a chatbot.
After uploading, open the relevant chatbot and assign the document from its Knowledge Sources settings. Documents that are already assigned display the name of the connected chatbot on their cards.
A document can remain in your central Knowledge Base until you are ready to use it.
Search and Filter Documents
Use the search bar to find documents by name or content.
The chatbot filter can help you view documents assigned to a particular chatbot, making it easier to understand which information each assistant can access.
Messages: Review Customer Conversations
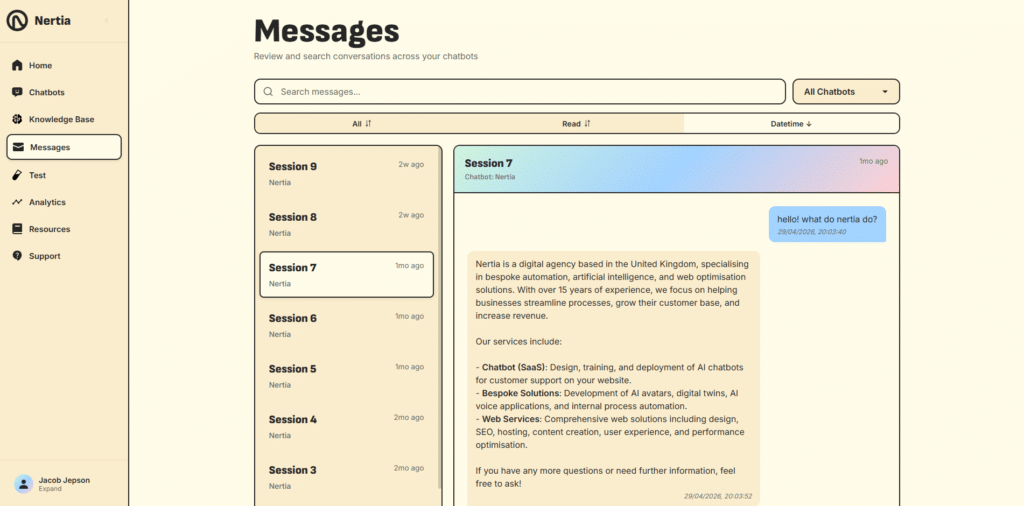
The Messages page allows you to review conversations between website visitors and your chatbots.
Chat sessions appear in a list on the left-hand side. Select a session to open the conversation and view the messages exchanged between the visitor and the chatbot.
You can use this area to understand:
- What visitors are asking
- Which subjects appear most frequently
- Whether the chatbot is providing suitable answers
- Where information may be missing
- Which questions should be added to your Knowledge Base
Search and Filter Conversations
Use the search bar to find relevant conversations.
You can also filter sessions by chatbot and organise them using the available columns and date controls.
This is especially useful when your account contains multiple chatbots or a large number of customer sessions.
Improve Your Chatbot From Real Conversations
Reviewing conversations gives you direct insight into the language and questions used by your customers.
When the chatbot cannot answer a question clearly, update the relevant Knowledge Base document or upload a new source containing the missing information.
Regular message reviews can help make your chatbot more accurate and useful over time.
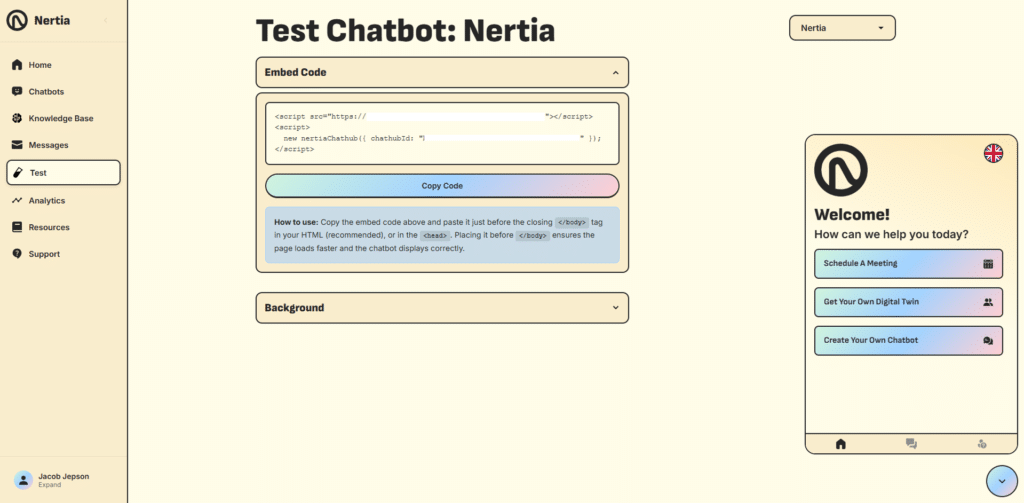
Test: Check Your Chatbot Before Launch
The Test page provides a controlled environment where you can check your chatbot before adding it to your live website.
Select the chatbot you want to test from the dropdown menu. The widget preview allows you to interact with it in the same way a website visitor would.
You should test:
- Welcome text
- Homepage call-to-action buttons
- Logo and branding
- Widget navigation
- Common customer questions
- Product and service enquiries
- Policies and support information
- Questions that are not covered by your documents
- Mobile and desktop layouts
Test Knowledge-Based Answers
Ask questions that can be answered using your assigned documents.
Check that the chatbot provides clear, accurate and relevant responses. When an answer is incomplete, review the source document and make the information more direct or detailed.
Review Your Embed Code
The Test page also displays the unique embed code for your selected chatbot.
Select Copy Code when you are ready to install it. The recommended method is to paste the code just before the closing </body> tag in your website HTML. It can also be placed inside the <head> where necessary.
The exact installation process will depend on the platform used to build your website.
Customise the Test Background
Open the Background settings to adjust the environment behind the chatbot preview.
This can help you check how the widget may appear against different website backgrounds.
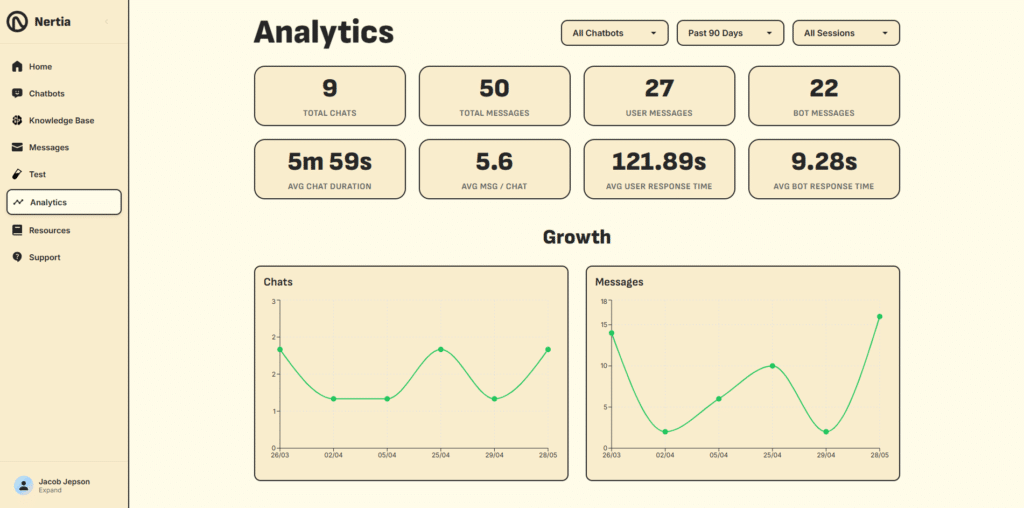
Analytics: Understand Chatbot Performance
The Analytics page provides information about how visitors use your chatbots.
You can filter the data by chatbot, reporting period and session type.
The overview includes metrics such as:
- Total chats
- Total messages
- User messages
- Bot messages
- Average chat duration
- Average messages per chat
- Average user response time
- Average chatbot response time
These figures provide a clearer view of chatbot activity and visitor engagement.
Monitor Growth Over Time
The Growth section includes charts showing changes in chats and messages across the selected reporting period.
Use this data to identify:
- Increases or decreases in usage
- Busy periods
- Changes following website updates
- The effect of new Knowledge Base content
- Differences between individual chatbots
Analytics shows how the chatbot is being used, while the Messages page helps explain what visitors are discussing.
Using both sections together gives you a more complete understanding of chatbot performance.
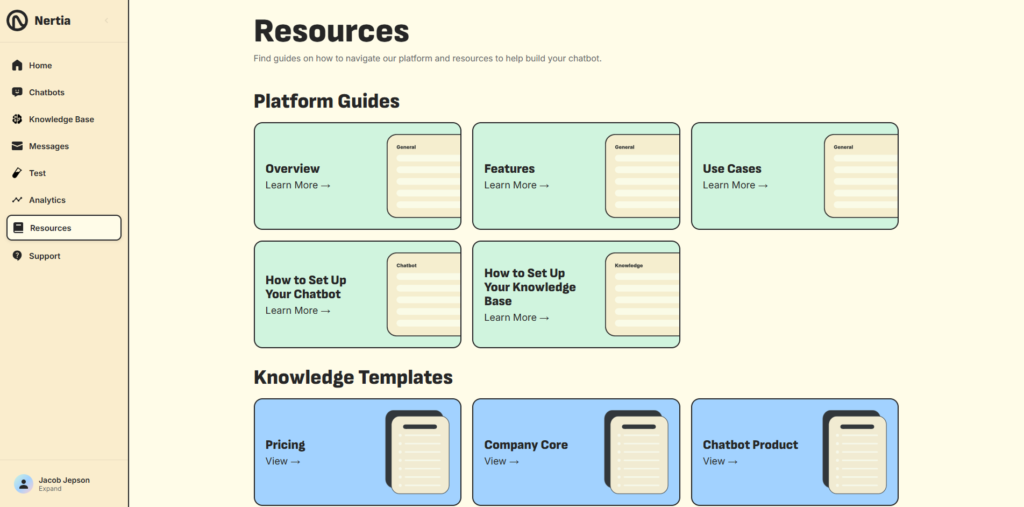
Resources: Guides and Knowledge Templates
The Resources page contains materials to help you understand the platform and prepare your chatbot content.
Resources are divided into two main groups.
Platform Guides
Platform guides explain how to navigate and use different parts of the Nertia Chatbot Maker.
Available topics may include:
- Platform Overview
- Platform Features
- Chatbot Use Cases
- How to Set Up Your Chatbot
- How to Set Up Your Knowledge Base
Select Learn More to open the full guide.
Knowledge Templates
Knowledge templates provide a useful starting point for creating chatbot documents.
Templates may cover areas such as:
- Pricing
- Company information
- Chatbot products
- Bespoke services
- Customer engagement
- Support
- Compliance and safety
Select View to open a template and adapt it to your own business.
These templates are designed to help you organise information clearly before uploading it to your Knowledge Base.
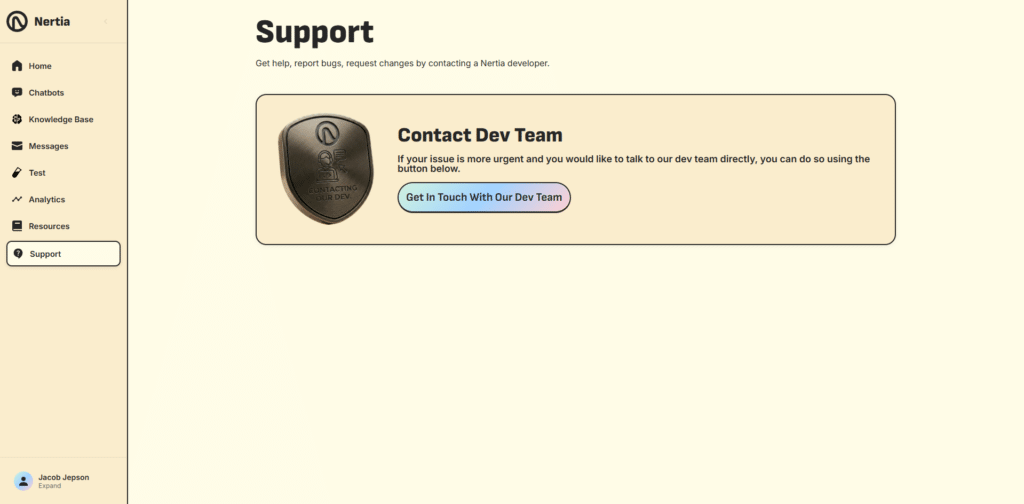
Support: Get Help From Nertia
The Support section gives you a direct route to help when you have a question or experience an issue with the platform.
You may use this area when you need assistance with:
- Setting up a chatbot
- Uploading or assigning knowledge
- Installing the website widget
- Managing your account
- Troubleshooting platform issues
- Understanding a feature
Provide clear details about the issue you are experiencing so the Nertia team can understand your request and respond appropriately.
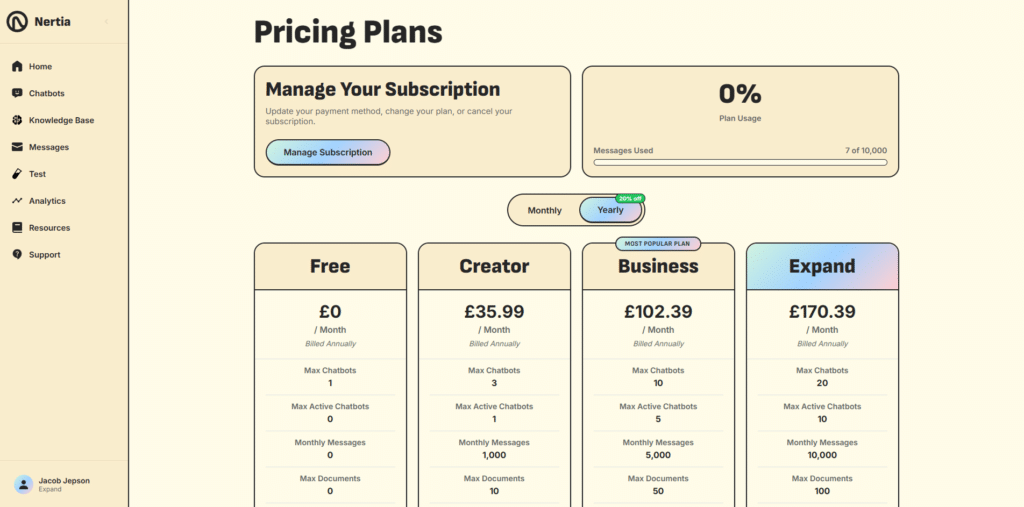
Account and Subscription Management
Your current plan is displayed on the Home dashboard and beside your profile in the platform sidebar.
Open your account options to access the Pricing Plans and subscription management area.
View Your Current Usage
The subscription page shows how much of your plan allowance you have used, including your monthly message activity.
This makes it easier to monitor your limits before selecting or changing a plan.
Compare Available Plans
Nertia offers different subscription tiers to support different levels of chatbot use.
Plans may vary by:
- Maximum number of chatbots
- Maximum number of active chatbots
- Monthly message allowance
- Maximum number of documents
Monthly and yearly billing options are available, with annual billing displaying the equivalent monthly cost.
Review the latest details on the Pricing Plans page before choosing a subscription.
Manage Your Subscription
Select Manage Subscription to update your billing details, change your plan or manage your existing subscription.
Choose a plan based on the number of chatbots you need, expected conversation volume and the amount of business information you want to upload.
How the Platform Sections Work Together
Each area of the Nertia platform supports a different part of your chatbot workflow:
- Use Chatbots to create and customise your assistant.
- Use the Knowledge Base to upload business information.
- Assign the relevant documents to your chatbot.
- Use Test to review its design and answers.
- Activate and install the chatbot on your website.
- Use Messages to review real conversations.
- Use Analytics to monitor activity and engagement.
- Return to the Knowledge Base and chatbot editor to make improvements.
- Use Resources and Support whenever you need additional guidance.
This creates a continuous process in which your chatbot can be reviewed and improved as your business and customer needs change.
Start Building Your Chatbot
The Nertia Chatbot Maker gives you one central place to design your chatbot, manage its knowledge and understand how visitors are using it.
Start by creating a chatbot, adding clear business information and assigning the most relevant knowledge sources. Once you have tested the responses and installed the widget, continue reviewing conversations and analytics to keep the experience useful and up to date.
You can access the platform at chat.nertia.io and begin creating your chatbot from the Chatbots section of your dashboard.
Platform Overview FAQs
What is the Nertia Chatbot Maker?
The Nertia Chatbot Maker is a platform for creating, customising and managing knowledge-based AI chatbot widgets for websites.
Do I need coding experience to use the platform?
No coding is required to design or configure the chatbot. Basic website access may be needed when adding the embed code to your website.
Where do I create a chatbot?
Open Chatbots from the sidebar and select Create New Chatbot.
Where do I upload my business information?
Upload your documents through the Knowledge Base section. You can then assign them to the relevant chatbot from its Knowledge settings.
Does uploading a document automatically assign it?
No. Documents must be assigned to a chatbot after they have been uploaded.
How can I check what visitors are asking?
Open the Messages section and select a conversation session to review the exchange.
Can I test a chatbot without publishing it?
Yes. Use the Test section to interact with the chatbot before installing it on your live website.
Where can I find the website installation code?
The embed code is available from the Test page and the chatbot’s Publish settings.
What information is available in Analytics?
Analytics includes chat and message totals, average chat duration, response times and growth data for the selected period.
Can I manage more than one chatbot?
Yes. The number of chatbots and active chatbots available depends on your subscription plan.
Can the chatbot schedule appointments directly?
The current chatbot does not schedule appointments within the conversation. You can add a call-to-action button that sends visitors to an external booking page.
Does the chatbot use conversion-based conversation logic?
No. The current version does not run conditional conversion flows. Call-to-action buttons on the widget homepage are used to direct visitors towards contact, booking or service pages.
Where can I find help using the platform?
Open Resources for guides and templates, or use Support to contact the Nertia team.